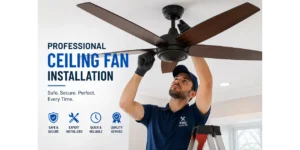
only an afternoon and the necessary tools, plus some basic patience. The majority of ceiling fan installations require only the replacement of existing light fixtures or ceiling fans. The process requires a time commitment of one to two hours.
We’ll walk you through it. We’ll cover the steps, how to install a bathroom ceiling fan, what drives ceiling fan installation cost up or down, and when you should just call someone else to do it.
What You’ll Need Before You Start
Grab these tools first. It saves a lot of trips up and down the ladder.
- Screwdriver (Phillips and flat head)
- Wire strippers
- Voltage tester
- Pliers
- Electrical tape
- A sturdy step ladder
- Your new ceiling fan kit
- A helper if you can find one
Check your ceiling box before you do anything else. It has to hold the weight of the fan. Fans are heavy. Some hit 50 pounds. And they shake when they spin. If the box is not rated for a fan, grab a fan brace at the hardware store. It goes in fast and does not cost much. If you are not sure, call an Electrician Sacramento.
You must vacate the space first before doing anything. You have to move the bed or sofa out of the way. If you don’t want to risk staining your floors, you have to cover them with a drop cloth. The action of stripping away all the old stuff creates dust that settles on the floor.
The Wiring Stage: Where Most DIYers Hit a Wall
This is the most common job. The installation requires you to replace an existing light or fan fixture with a brand-new fan. The wires are already up there. The following steps present the complete process to install a ceiling fan
Step 1: Turn Off the Breaker
Walk to the breaker box and flip the switch for that room. Then grab your voltage tester and hold it near the wires. No beep means no power. Now you are safe to start.
Step 2: Take Down the Old Fixture
Start with the light bulbs. Take them out first. Then pull off the glass cover or shade. The fixture needs to be held up to prevent wire damage. The wire nuts need to be untwisted. Before you disconnect anything, snap a quick photo with your phone. The documentation process will help you remember the wire connections from their original state.
Step 3: Put up the mounting bracket
Your new fan came with a mounting bracket. Screw it to the ceiling box using the screws provided. Pull the house wires through the hole in the middle of the bracket. Make sure every screw is tight. A loose bracket is the main reason fans wobble later.
Step 4: Build the fan on the ground
Do not try to do this on the ladder. Trust me. Slide the downrod into the top of the motor. Tighten the set screw. Run the fan wires up through the downrod. Slide the canopy on, too. Now your fan is ready to hang in one piece.
Step 5: Hook up the wires
Lift the fan and rest it on the bracket hook if your fan has one. If it does not, have your helper hold it. Now match the wires.
- Black wire to black wire. This is the hot wire.
- White wire to white wire. This is the neutral wire.
- Green or bare copper wire to green or bare copper wire. This is the ground.
- Blue wire goes to black if you want the light to work with the same switch.
Twist each pair together with a wire nut. Wrap electrical tape around each one. Tuck the wires back into the box.
Step 6: Finish up
Push the fan up to the bracket and screw on the canopy. Put the blades on last because they bend easily. Add the light kit if your fan has one. Pop in the bulbs. Flip the breaker back on and test every speed. Check for wobble.
If it wobbles, do not freak out. It is almost always a loose blade screw or one blade that is a little off. Your fan came with small balance clips to fix this. They go right on the blade. Slide the clip to a new spot and test again. Keep moving it until the wobble stops.
Ceiling Fan Installation: Stricter Rules, Higher Stakes
Ceiling fan operates differently from standard ceiling fans. The wiring system requires three mandatory rules that need to be followed because it shares similarities with other systems.
First, the fan has to be rated for damp spots if it sits over a tub or shower. Check the label on the box.
Second, the vent pipe has to blow air outside your house. Not into the attic. Never into the attic. If you vent into the attic, you will grow mold up there. That is a big fix and a big bill later.
Third, the circuit needs GFCI protection. That is the same kind of outlet you have near your bathroom sink. It cuts power fast if water gets in.
If you are cutting a new hole in the ceiling or running new ductwork, that is a bigger job than this post covers. But the wires hook up the same way as any ceiling fan. This also applies when planning a Ceiling Fan Installation Sacramento.
What Does Professional Ceiling Fan Installation Actually Cost?
What people want to know is, “How much would it cost to mount a ceiling fan”? And yes, the answer is “It depends upon some factors.”
The fan itself
The cost of a basic fan remains low. The price of a designer fan that includes smart controls and a light kit exceeds basic fan costs. Select a fan that suits both your room dimensions and your budget requirements.
Do you have wiring already?
If you are swapping out an old light or old fan, you are just paying for labor. That is the cheapest kind of job. If there is no wire at the spot, someone has to run new wire. That costs way more.
Your ceiling height
Normal eight foot ceilings are easy. High ceilings, sloped ceilings, and cathedral ceilings take more time and more tools. The bill goes up.
The fan brace
If your ceiling box is not rated to hold a fan, you need a fan brace. Not a big add, but it is still part of the total.
Where you live
Labor rates are higher in big cities. A job in a small town can cost half as much as the same job downtown. Always get two or three quotes before you pick someone.
DIY vs hiring someone
If you do it yourself, you only pay for the fan and a few small parts. If you hire a pro, you pay for their time too. A simple swap is fast. A brand new install takes a lot longer.
When You Should Call a Professional
Be honest with yourself. Some jobs are not worth doing alone. Call a pro if:
- There is no wiring at the spot where you want the fan
- Your home has very old wiring, like knob and tube
- Your ceiling is over 12 feet tall
- Something feels wrong after you cut the power
People should not feel embarrassed about making phone calls. A professional can complete the task within one hour.
FAQs
Can I put a ceiling fan where a light fixture used to be?
Yes, but only if the box is fan-rated. If it is not, put in a fan brace first.
How long does ceiling fan installation take?
About one to two hours for a simple swap. A whole day if you are starting from scratch.
Do I need a permit?
Usually not for a swap. But new wiring often needs one. Call your city building office if you are not sure.
Wrap Up
Ceiling fan installation looks scary the first time. It is not. Take your time. Respect the wires. Test the power twice. You will have a new fan spinning above your head by dinner time.